Has everyone seen the new cookie shot glasses that are making the blog rounds? It was announced recently by Dominique Ansel, who gave us the cronut in 2013. These have been seriously big news the last week. Well, a friend of mine decided that I needed to make some. So. Here we go…
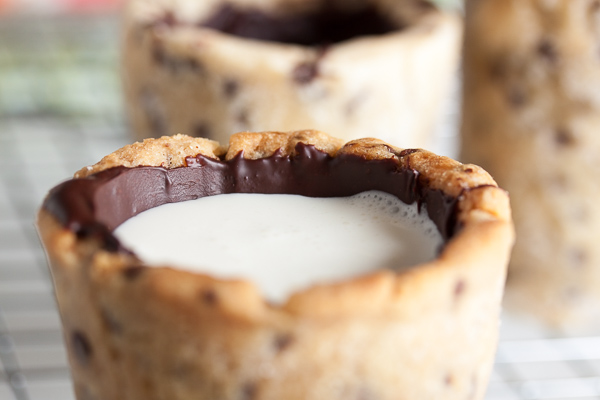
The thing is, I’ve seen cookie shot glasses before. For example, Shari at Whisk made some gingerbread ones back in 2008, and there’s a tumblr called Shotibles that features several of them (although it hasn’t been updated in about a year and the associated blog has shut down, so there are no instructions or recipes). I have no doubt there are more – that’s just what I found with a quick search. I’m not sure what’s so revolutionary about these, except maybe the fact that they’re chocolate chip cookies. I mean don’t get me wrong, I’m sure Ansel’s version is amazing and I would love the chance to try one (I read something about gooey Valrhona chocolate chunks and vanilla-infused whole milk), but the shot glass concept itself isn’t new.
The best dough for something like this is obviously one that doesn’t spread or distort as it bakes, right? Have we all seen that cookie bowl fail? That’s what happens when you use the wrong dough. A cookie cutter dough should be ideal, but I’ve never seen roll-out chocolate chip cookies before. Google? Oh look, SweetSugarBelle posted a recipe in 2011. Sounds like a great starting point!
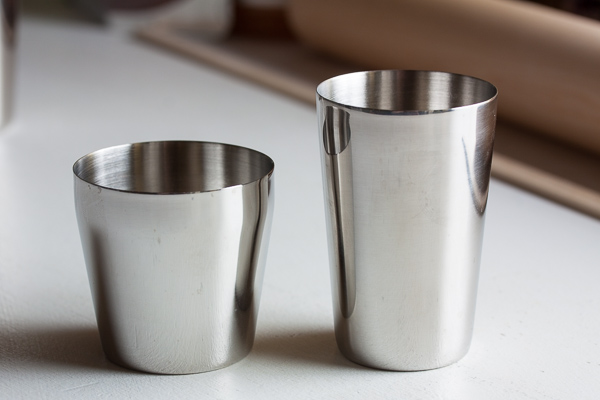
Next, some sort of mould to bake them in. Shari recommended using an oven-safe shot glass. I know I’ve seen stainless steel shot glasses before, but could I find any? No, of course not. I did, however, find some rum baba moulds (both tall & thin and short & wider) that looked like they’d do the trick. I bought one of each just to do some testing. A popover pan looks like it should also probably work – the cups would be slightly larger than a shot glass, but that could be a good thing.
Shari formed the cookie inside the mould, and based on the photos I’ve seen, so did Dominique Ansel. I actually tried to do one formed on the outside just to see how it would look, but it just fell apart and it’s best to forget about that attempt altogether. Plus by forming the cup on the inside of the mould, the outside of the cookie has a clearly defined shape and a smooth flat bottom. If the inside is a bit misshapen? No one will know.
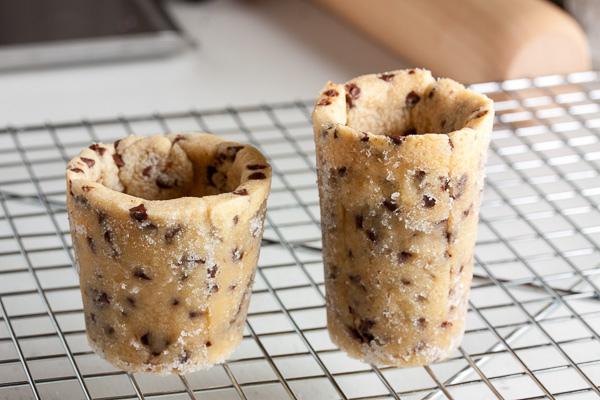
I brushed the insides of the moulds with shortening and then sugared them as well. Next time I’ll skip the sugar, or maybe just use it on the bottom, because the finished cookie came out with a bit of a sugar crust. Not quite the look I was going for.
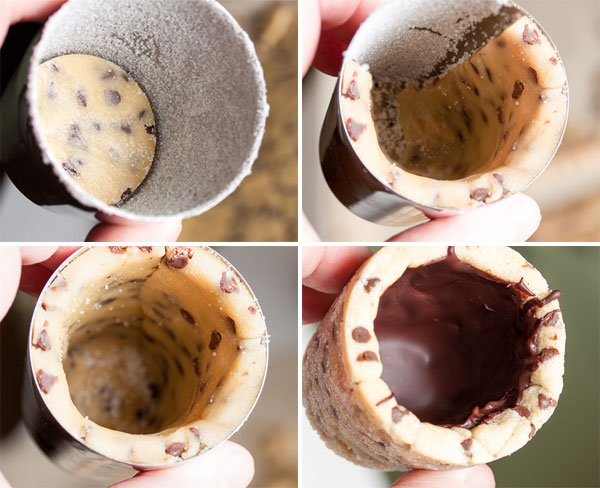
I used a small circle cookie cutter to create a shape for the bottom of the cookie and dropped that into the mould. For the sides, my first thought was to cut a rectangle of dough and form it into a cylinder to put into the mould. But the dough cracked and broke when I tried to curl it. So what I ended up doing was cutting that rectangle into strips and then pressing them into the mould one-at-a-time, ensuring there was some overlap with each other and the bottom circle to create a good seal.
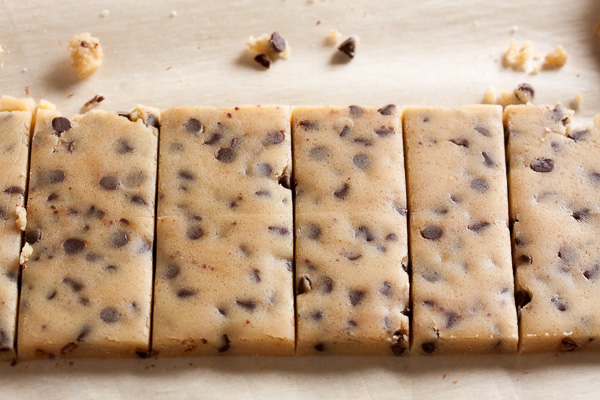
I made one cup using each of the two moulds, and then I got fancy and used them together as a 2-piece mould to give it a more finished appearance both inside and out – with the cookie inside the shorter mould and the taller mould inside the cookie. In the end, it didn’t make much difference other than needing more baking time. So don’t worry about trying anything like that. Just forming the cookie inside a mould is sufficient.
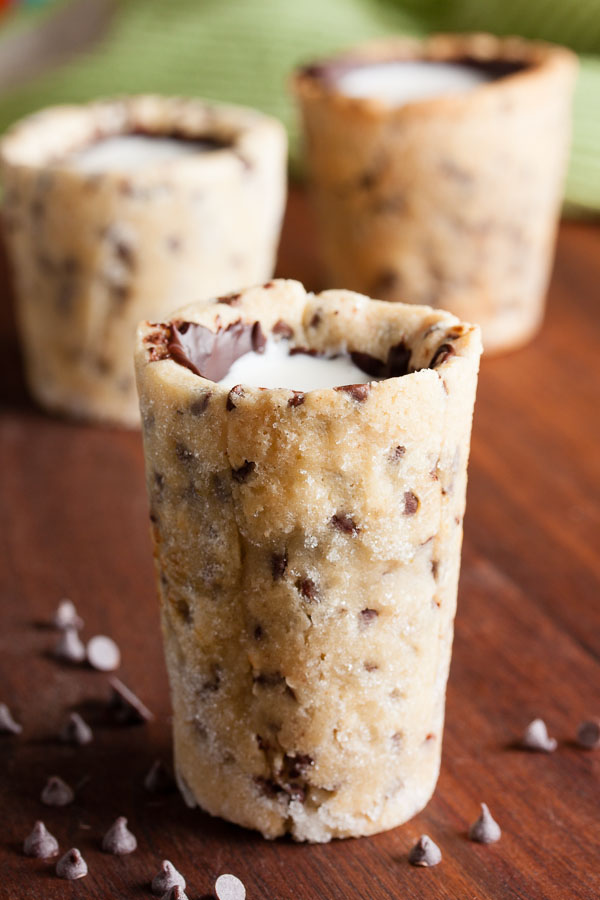
The cup shapes needed a longer baking time than a regular cookie. Since I only made a few sample cups this time around, I cut the rest of the dough with a cookie cutter and baked them up as regular cookies. Those took about 12 minutes, but I didn’t feel like the cups were done until almost 17 minutes. The bottom of the cup puffed up a bit in the oven, so I flattened it back out before it cooled completely. The mould retained a lot of heat, and it was about 15 minutes before they were cool enough to get the cookie out. And then they came out fairly easily – I just had to pat the bottom a few times and the cookie popped right out. Other than the aforementioned sugar crust, I think they turned out great!
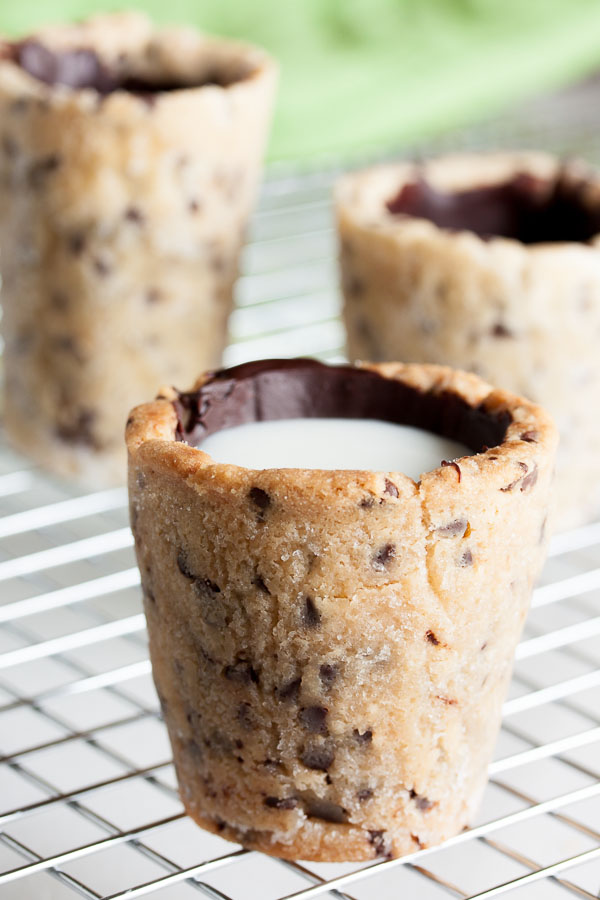
The real test, however, was would they hold milk? Sadly, no. They leaked. Shari suggested putting them in the freezer to help prevent leakage, but I didn’t want to eat a frozen cookie. So instead I melted some chocolate and applied it to the inside to create an inner chocolate lining. I’ve seen that trick used before with cookie bowls. More chocolate? Bring it on! And it did the trick. Success! I now have (semi) perfect little shot glasses that will hold milk. Yay!
And check this out. I did some more googling after I made my cookies and found additional photos of Ansel’s version of the shot glass. In these, you can tell that he lined them with chocolate as well. Aha! (Update: On further reading, I’ve learned that Ansel’s cookie shots are served warm, and that they’ve switched from a chocolate lining to a heat-resistant glaze as the chocolate lining melted when the cookie was heated.)
So, verdict? These aren’t that difficult to make at all. You just need a good non-spreading cookie dough and some chocolate to coat the insides. And because of the longer baking and cooling times, you’ll definitely want more than just a couple moulds to work with. Yes, mine are a bit wonky looking. But you can learn from my mistakes and yours will be so much prettier. So get out there and bake some cookies!
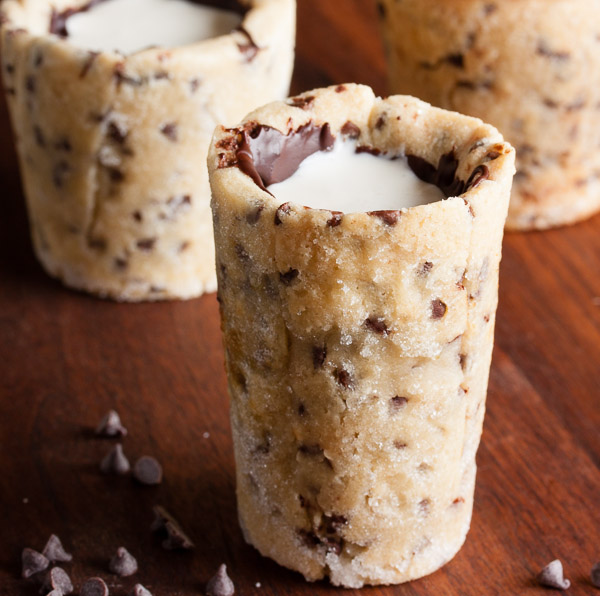
cookie shot glasses
I'm guessing this will work with any good cookie cutter dough. If you want to try something other than the chocolate-chip cookie recipe, check out these recipes for sugar cookies, chocolate-ginger cookies, and my favourite gingerbread. Otherwise, I would definitely recommend this chocolate chip cookie recipe. They're a bit crunchy but still soft – almost like a shortbread studded with tiny chocolate chips. A perfect cookie to dunk in milk, or fill with milk! (or Baileys, I won't judge)
ingredients
1 cup unsalted butter, at room temperature
1/3 cup granulated sugar
1/2 cup light brown sugar
1 large egg yolk
2 teaspoons pure vanilla extract
2-1/2 cups all-purpose flour
1/2 teaspoon salt
1-1/2 cups semi-sweet mini chocolate chips (I thought this was too much for the shot glasses and just used 1 cup – still plenty of chocolate chips in there!)
additional requirements
oven-safe moulds, such as stainless steel shot glasses, rum baba moulds (tall & thin or short & wider), or a popover pan
chocolate to coat the insides of the cups (dark, milk, or white – your preference)
preparing the dough
In a medium bowl, whisk together the flour and salt. Set aside.
In the bowl of a stand mixer fitted with the paddle attachment, beat the butter and sugars together on medium speed until light and fluffy, about 3 or 4 minutes. Scrape down the sides of the bowl and add the egg yolk and vanilla and beat to incorporate.
Turn the mixer down to low and add the dry ingredients, mixing until just barely combined. Remove from the mixer and knead in the mini chocolate chips by hand to ensure they're distributed evenly.
Divide the dough into 2 portions. Roll each portion out onto a piece of parchment or wax paper to just shy of 1/4" thickness (I used a 3/16" guide). Stack the 2 pieces (paper included) onto a baking sheet and refrigerate for at least 30 minutes (I let them chill overnight).
assembling the cookies
When ready to bake, preheat the oven to 350°F.
Prepare your moulds by brushing the insides with shortening.
Remove one of the dough pieces from the fridge at a time (keeping the dough chilled will help prevent spreading in the oven). Use a small circle cookie cutter to create a shape for the bottom of the cup. Then cut out multiple strips slightly more than the height of your mould to create the sides.
Drop the cut-out circle into the bottom of your mould, and then press the strips into the mould, along the sides, slightly overlapping the bottom to create a seal. Continue adding strips and pressing them together, working your way around the mould until you've created a complete cup shape.
Place your moulds on a baking sheet and bake for a few minutes longer than whatever your original recipe calls for – in this case, about 13-17 minutes. Keep an eye on them – they will begin to brown around the top edge when they're done. Be sure not to underbake these – you want a sturdy cookie to hold your milk.
Remove from the oven and place the moulds on a cooling rack. When they're cool enough to handle, turn the moulds upside down and pat the bottom a few times to get the cookie to drop out. You may need to squeeze the sides a bit to get the cookie to loosen.
finishing the cups
Gently melt the chocolate in a small microwave safe bowl or on top of a double boiler, stirring often so it doesn't scorch.
Working with one cookie cup at a time, pour in a small amount of the melted chocolate. Immediately, swirl the chocolate around a bit and pour out the excess – you don't need a thick layer of chocolate, and a thinner coat will dry quicker. It doesn't matter at this point if the sides are completely coated – this is mostly to ensure the bottom has a good seal. If the sides are coated? Great, you're done! If not, use a butter knife to apply a small amount of chocolate at a time to completely coat the sides. Again, you don't need a thick coat, but you do want to make sure there isn't any cookie exposed.
Allow the chocolate to dry completely before filling the cups with liquid.





What an interesting read. I love that you took the time to make these cookie shots. The concept is so simple but I don’t know if I want to go through all that work, so extra kudos to you!
Thanks Christine! I have to admit, if not for my friend asking for them, I probably would have never tried this. And in the end they’re really not much more complicated than making cookie cutter cookies. The biggest hassle was finding an appropriate mould.
these are such a great idea!
I can’t take credit for the idea, but I did figure out the execution. 🙂
Great job!!!! I’m not sure I have the patience to make these, but they look awesome! I am very tempted to give them a try.
Thanks Stephanie! If you can find some moulds, you should totally give it a shot. 🙂
These are looking absolutely great!
Thanks Lavender! 🙂
For what it’s worth, I think yours are more attractive than Ansel’s – straighter, a more appealing color, and the sugar crust is a positive addition! I usually skip by fiddly-seeming recipes, but this one…might be the exception! Thanks for posting your efforts!
Wow, thank you so much Beth ♥
I’m a big fan of simpler recipes too (as you can tell by all the drop cookies on this blog). I was honestly expecting to have several failed attempts at these cups, but these were surprisingly not that complicated to make at all. I really lucked out in my choice of cookie dough.
[…] Edible shot glasses made from treasured childhood flavours. Fill it with milk by day, and a little chocolate liqueur for an after dinner, weekend […]
Do you have a cookie recipe that you can recommend for this?
YES!! I’d actually linked to it in the post, but you’re not the first person who’s asked about it so I’ve just updated the post to include the full recipe. 🙂
[…] I’d do shots of milk with these cookie shot glasses. […]
[…] Cookie (milk) shot glasses. (via The Kitchn) […]
I always put my Girl Scout cookies in the freezer. They don’t get hard or freeze. They just get very cold. And they are really good cold
One of my friends does that too, and she swears they’re better frozen. I’ll admit I haven’t tried it yet (don’t knock it, right?). For you, I’ll give it a shot. 🙂
This is great. I’ve been trying to find a recipe for these that doesn’t include store bought cookie dough (blech) . I appreciate the detailed description of what you went through to get to the final product! I’m definitely making these.
Thanks April! I’m a bit of a snob when it comes to making things from scratch too (okay, HUGE snob – hee!). Please let me know how they turn out for you. 🙂
HOLY COW – I just shared these with my facebook followers, tried to tag you – but don’t see you out there. These are AMAZING, I think my husband would marry me all over if I could perfect these, I would be too intimidated to make these, they are out of this world!!
Thank you Rachel! Setting up a Facebook page is one of many things on my to-do list (seriously, I can’t keep up). But thank you for sharing the link. 🙂
Do NOT be intimidated by this recipe. It’s seriously not that difficult if you have the moulds to work with!
Would popover pans work instead of shot glasses?
I’m sure they’d work fine, you’d just end up with a slightly larger cup. Are you going to give them a try?
You should try DeMarle molds. I cut a large circle, turned the DeMarle mini cupcake mold upside down and baked. Not exactly a perfect shot glass shape but really quick and made a good seal without chocolate. Of course I had to add the extra chocolate linking. 🙂
Cool, thanks for the tip!
I made them with my friend! Had so much fun doing it! And it tasted amazing too! YAAAY
YAAAAYYY!!!
well i know what kind of shots i want for my 40th next month !YUM
😀
These would be great filled with ice cream, chocolate mousse, or cheesecake!
Absolutely. In that case, I’d make them in a muffin tin so they can hold a more substantial serving. 🙂
[…] duplicate this sweet treat and the talented baker over at Wanna Come With? came up with a fantastic recipe and tutorial, which I used to create the confection in the above […]
WOW, this sounds good, but also sounds like a ton of work, and takes forever to make. I think I will just stick with my adult jello pudding shots. They are awesome and east to make.
Hi, how did you remove the mould from the container? I’m a little confused sorry
Hi, sorry that wasn’t clear. I baked the cookies inside the moulds. After allowing them to cool for about 15 minutes (until they were cool enough to handle), I just turned the moulds upside down and patted the bottoms a few times to get the cookie to fall out. One of them didn’t come out easily and I had to squeeze the sides of the mould a little bit to loosen it. Does that help? Please let me know if it’s not clear. 🙂
Okay, thanks for that! In my country, we don’t have popover pans or the tools you use. Would it be ideal to use a shot glass? Or what would you suggest? 🙂
Whatever you use, it needs to be oven-safe. So stainless steel shot glasses would work fine, but not glass. You might want to just go to a local kitchen store and see what they have – you might have options in your country that we don’t have here!
Hi
So Wonderful 😉
I’d like to try it, so is it possible to have the ingredients in gramme?
Many Thanks!!!
Absolutely, Geraldine! I usually work in a mix of volume & weight measurements, depending on the ingredients. Most recipes in North America are measured by volume (usually imperial), so I do a lot of conversions myself. There’s a great resource over at PastryScoop for converting from volume to weight and imperial to metric (link). For this recipe, it works out to:
226g unsalted butter, at room temperature
67g granulated sugar
110g light brown sugar
1 large egg yolk (large egg = approx. 55g)
8.5g pure vanilla extract (2 tsp)
312g all-purpose flour
2g salt (1/2 tsp)
180-270g semi-sweet mini chocolate chips (I used 180g)
I hope you make them!
Hi,
I want to make these for my son’s birthday party as get are great for both adult and kids. Since I don’t have a popover pan can I use the cupcake pan? How long do they stay fresh? I want to make them ahead of time.
You can definitely use a cupcake pan, but they’ll be more like small bowls than cups. If you’re okay with that, go for it! Like most cookies, they should be good for at least a week, maybe two. Keep them stored at room temperature in an airtight container. Good luck!
Great concept looking cookie although been dona already before a gentleman asked me to make espresso cups for him the muffin pan worked very well as a mould and then you fill them with candy a little bit more work but well worth it love these shot glasses chocolate and wine
Thanks Angela 🙂 When my friend requested (demanded) these, she said she wanted “shot glasses”, so I was focussing on shot glass shaped containers. You can definitely use muffin tins (or any oven-safe container), but they’re more like small bowls than cups, and that just wasn’t what she wanted. But I agree, they make great little containers for all kinds of treats. I’ve actually linked in my post to several other blogs and photo sets of cups that other people have made. 🙂
Looked at Ansel’s photos and yours blow them out of the water! I think your cookie shots look perfect and mouth watering…. you have a gift
Wow. That has to be the best comment I’ve ever gotten. Thank you so much!
While I was at my local kitchen store this afternoon I found this
http://www.amazon.ca/Silicone-Shot-Mold-Round-10-Cavity/dp/B00KKUYBFU/ref=sr_1_fkmr0_1?ie=UTF8&qid=1410638313&sr=8-1-fkmr0&keywords=wilton+silicone+shot+glass+molds
Hopefully they turn out with the silicone mould.
I remember reading somewhere that someone was going to try making them with a mould like that, but I never heard how it turned out. Are you going to try them? Please post back if you do!
So I gave them a try last night with the silicone mould. Being able to just sort of shove the dough in and squish it around and pinch on either side of the mould was helpful in that you didn’t have to do much shaping yourself.
My one real complaint was how much longer they took to be done. After about 20 minutes the tops were done, but the insides were still pretty doughy. It took close to another 10 minutes for the sides of the cups to be cooked properly. I may try this again with a thinner cookie dough since you don’t have to worry so much about the actual moulding.
Wow, that is a long baking time. I’m guessing the tops were a bit overdone by then too. Even just in the metal moulds that I used, they took a really long time to bake. Not that long though. Thank you so much for letting us know how it worked out!
What a brilliant idea! Can’t wait to give it a try.
how many shot glass size cookies did it make approximatley?
Sorry, I only made a few shot glasses out of this recipe, and made regular cookies out of the rest of the dough.
Can I know did you put anything inside when you bale ? Like some weight to make sure they don’t puffed at all . Cause I tried and they puffed . did I made some mistake along the way ? I was sure I didn’t do anything wrong
Hi Sean – I’m sorry to hear you had a problem with this. Mine puffed up a tiny bit on the bottom, but I could just flatten them back out with my finger. I did try one cup with something inside, but it took a really long time to bake and I didn’t actually notice any difference in the way it held its shape.
Did you use the recipe I have posted? Or a different recipe?
I did follow yours and another one . They just puffed up like a cupcake instead . .
Did both recipes puff up? Mine really shouldn’t have – there’s no baking powder or soda in this recipe, and that’s what causes cookies to puff up. Egg can cause that too, but the recipe only contains a single egg yolk so that shouldn’t be a problem. I can’t speak for the other recipe though as I don’t know what’s in it. Could you provide a link? Or a list of ingredients?
To make these cookie cups work, it’s really important to use a cookie dough that’s meant to be used with cookie cutters, as they’re designed to hold their shape while baking.
Do you have an email where I could pm you instead ?
Can I use ceramic cups instead ofshot glasses as we don’t have these here?
Hi Sarah
If the ceramic is oven-safe, you should be able to use them. But only if they’re marked oven-safe. Otherwise they’ll crack and you’ll end up with a big mess. I wouldn’t try it unless you’re sure about this. You’ll probably need to adjust your baking time as well as ceramic bakeware holds heat differently than metal. Could you maybe find some other type of mould, like a popover pan?
BUMMER–I tried to make these tonight and did not have success. 🙁 I followed your recipe exactly and used the metal molds. I got 11 from the recipe.
They totally puffed up, though, and after 17 minutes I took them out and used the handle of a spatula to push the sides back in place as the entire mold was filled with dough and the sides were slipping down from the top. I did this again at 24 minutes because they were still puffy and definitely doughy. Maybe I put too much dough in each one, but the thickness looked just like the ones in your photo, so I was excited that everything seemed right.
I appreciate any advice you have as I sure would like to share these with friends.
Hi Pam
I’m sorry to hear you had problems with this one! One other person had a problem with them puffing up as well, but I haven’t heard back from him and am not sure what went wrong there.
It’s possible the butter was too soft, or the dough too warm – that could cause the problem with the dough slipping down. You could try refrigerating the dough before baking – you could even put it in the moulds first and then refrigerate it for awhile to help it hold its shape.
But there really isn’t anything in this recipe to cause them to puff up – there’s no baking soda or baking powder, and not even a whole egg, just a yolk (you just used the yolk, right? using the whole egg could have caused the puffing).
As for thickness, I rolled mine out to a little less than 1/4″ thick, but I’ve seen posts elsewhere with this exact same recipe where they just smoosh the dough into the mould rather than rolling it out, so I don’t think the thickness is that critical. (here’s one on popsugar – it bothers me that they didn’t give credit to the original author of this recipe)
Please let me know if you try this again – I’d love to help you figure out what went wrong and be able to help anyone else who might have a similar problem!
RIGHT–I read a few different recipes for this treat and combined the techniques, so I did refrigerate the filled molds before I baked them. Perhaps that is also why they took so long? The engineer in me thought that your approach of rolling out the dough and cutting a circle for the bottom and rectangle for the tube was brilliant, so I adopted that from you. Per your recipe, I did use just the egg yolk.
I did try a second batch, again using your recipe and technique and did not chill them before baking. I rolled the dough out a little thinner, and got 14 shots this time. The dough did not puff up as much, maybe because I used less, though they did slip down from the top of the mold and so at the half way point of baking, I took them out and used the flat handle of a fork to press everything back in place. UGH. Too much fussing for me.
I also wanted to let you know that removing the cookies from the molds was not easy for me the first time. Although I sprayed them thoroughly, they sure did not just slip out for me with a little pat as you and some others indicated. I had to put my fingers inside the baked cookie and twist and pull to release it from the mold. Not easy and I broke two of them.
So, the second time, my husband wisely suggested using a narrow sling of parchment to help. HOORAY! That totally worked! I just used a 1/2″ by 6″ or so length of parchment as a sling inside the mold and pressed the cookie dough on top of it. Once they were baked and cooled, it was easy to use the overhanging parchment to extract the cookie from the mold.
I must say that everyone at the party LOVED these cookie shots, both the thicker first batch and thinner second batch, so that is good. I think that the sturdy and less sweet dough definitely needs the extra chocolate slathered on it, so extra bonus because it is necessary to seal the shot for the liquid, anyway. I am not sure that I will go through the process again, though, because it was pretty labor intensive. Appreciate your willingness to help and perhaps the parchment idea will benefit someone else.
That parchment idea is BRILLIANT. I always use parchment in loaf and cake pans, but it didn’t even occur to me to adapt it to these moulds.
I’m sorry to hear you still had so much trouble with them though. I didn’t have any issues with mine slipping at all – I wonder if using more flour would help the dough hold its shape better? It’s really interesting that the thinner ones puffed less. Next time I make some roll-out cookies I’ll test a few at different thicknesses and see if that holds true… That’s really good to know about.
Yes, these are fiddly and labour intensive (which is why I only made a few of them), but they do have that “wow” factor, so it’s totally worth it for a special event. So in spite of all the troubles, I’m really glad to hear everyone appreciated them! Thank you for letting me know how they turned out in the end 🙂
I think that we used the same mold, from Ateco, for these, so it is interesting that we had such different experiences with the same dough. I guess that leaves the oven as a potential culprit. Mine is brand new and calibrated, so that is probably not the cause, either. A mystery, for sure!
Ateco also makes a shorter and wider shot glass, so perhaps I will try that should the occasion arise again. I saw both of them at Sur La Table, and bought the taller one because I was thinking about the photos on your blog. Maybe the squatter version would work better for me.
I will keep you posted. . .
You’re right, it is weird. And not knowing bugs me! Just fyi, my oven is old and totally out of whack, but I use an oven thermometer rather than trusting the dial, so my temperature was pretty accurate. Yes, my moulds were the Ateco ones too – I used both the tall and short ones and didn’t notice any difference between them in how the cookies turned out.
Seriously, if you try these again? I’d love it if you could let me know how you do! Thanks 🙂
Will do! Now, I am planning to make your Chewy Chocolate Gingerbread cookies for my first-ever book club meeting on Wednesday. . .
Ooooh, warning – you might want to make a double batch. Those cookies are the BEST.
EXCELLENT–looking forward to impressing my new neighbors! Can I roll those cookies in turbinado sugar or is granulated best?
I’ve only ever used granulated on this recipe, but I think turbinado would be delicious with dark chocolate and gingerbread. They just wouldn’t have the same look (the fine sugary sparkle). Why don’t you try one of each and see which you prefer?
Smart lady–I will do just that because I like the crunch of that larger crystal sugar though you are right that it won’t be as pretty. I made the dough last night (so easy, smelled great and rolled beautifully). I will sugar them up before baking tomorrow afternoon. THANKS!
I love that large crystal too – sometimes I’ll decorate with demerara instead of sanding sugar. Also, you’ll probably find they’ll pick up more sugar if you roll the dough balls in your hands to warm them up a wee bit first. Good luck! 🙂
Wow looks amazing! Just wondered do you know how long they’ll keep before the cookie get’s too soft?
Hey She-Ra (love it!)
Like most cookies, these should be fine for about a week if kept well-covered. And as other people have mentioned, they should also freeze well too – just be sure to wrap them tightly in plastic wrap first, AND put them in a freezer bag to avoid freezer burn.
You could also make the dough in advance and freeze it, and then bake them just before you’d like to serve them!
Fab thanks so much! Agree with others yours look much better than Ansel’s 🙂
omg, thanks! ♥
Hi, I love this cute idea. But I’m wondering if the cookie dough could be pressed around the underside of a mini muffin pan.? Just something to ponder. I know the shape may not be as desirable but…idk. just a thought.
I’ve seen posts where this is done (I linked to one up above when I mentioned Pinterest fails). Personally, I would put the dough inside the tin instead. That way the outside of the cup has a nice clean shape. 🙂
As soon as I saw this recipe, I googled, cookie shot glass mold and immediately found a Wilton product. Wilton actually makes a 8 cavity silicone shot mold and they specifically indicate one of the uses as choc chip cookie shot glasses. It can go in oven and freezer and dishwasher.
Hi do you know how many these will make I shot glass form? Looks so cool thanks!
Hi Amy. When I made these, I was just testing out the idea of doing shot glasses so I only made a few. But other people have made them and have gotten between 12 and 16 shot glasses from one batch of dough – it depends on how thick the dough is rolled and the size of the moulds. Hope that helps 🙂
hi! what’s the difference between shortening and butter? is it okay if i use shortening instead of butter??
Hi Mariz
The biggest difference between shortening and butter is the fat content. Butter is usually 80-85% fat, while shortening is 100% fat. Using shortening instead of butter will result in a softer cookie – which may not be good for something like this where you want it to hold its shape. It also won’t have the same buttery flavour, obviously. I can’t say for sure whether it would work out or not, but you can always try?
okay, thanks for that! I think i’ll be using butter instead of shortening . How about the chocolate for coating the inner part of the cookie, is it okay if any kind of melted chocolate? ’cause i’m not sure if it can possibly hold the milk.. and for the texture of the cookie dough, is it okay if it is crumbly i’m confused..
okay, thanks for that! I think i’ll be using butter instead of shortening . How about the chocolate for coating the inner part of the cookie, is it okay if any kind of melted chocolate? ’cause i’m not sure if it can possibly hold the milk.. and for the texture of the cookie dough, is it okay if it is crumbly ? i’m confused..
Haha! It’s ok. Did you make the dough and it came out crumbly? It shouldn’t really be crumbly. If it is, you can let it rest for awhile – that will help the dough hydrate properly before you roll it out.
As for the chocolate, you can just use melted chocolate chips if you like.
Feel free to ask any questions! I’ll try to help you as much as I can 🙂
thank you very much! I really appreciate your advice. 😀 can i approach you and ask again when i have some questions? hahah! 🙂
Absolutely! No guarantees I’ll have the answer, but I’ll try 🙂
[…] then I stumbled on a cookie shot glass recipe from Wanna Come With? and it looked very promising. However, I like an extra chocolate flavor in my cookie, so I decided […]
[…] 4. Copinhos com Nutella: Cakes Cottage | 5. Cupcake: Cupcake Diaries | 6. Copinhos de cookies: Wanna Come With | 7. Colher de cookie com brigadeiro: Parapluie […]
[…] credit photo […]
Just discovered these! Thanks.
You’re welcome! I hope you enjoy them 🙂
For the mold, what do you think of using a few tomatoe paste cans?
Hi Stacie! I’ve heard of people using empty food cans for baking, but I’d be a bit worried about getting the cookie out in one piece. The molds I used have sloped sides so the cookie came out pretty easily. You might have a bit of a struggle getting it out of a straight-edged can. I can’t say for sure! You could always try one, and if it doesn’t work just refrigerate the dough until you get some proper molds (it should be fine for a few days), or bake the dough up as regular cookies. Please let me know if you try, though – I’m sure other people would like to know. 🙂
I was curious as to how far in advance I can make these ? Thank you!
Hi Corisa! These are basically just cookies, so they should be absolutely fine for at least a week. If you want to make them further in advance, you should be able to freeze them fine. You could even do all the prep work in advance, put the dough in the moulds, and then freeze them before they’re baked. Then you can just pop them in the oven closer to the time you’d like to serve them and have fresh cookies. Good luck!
[…] If it’s creativity to seek in order to have your joy of baking sparked again, then this recipe is the one for you. All it involves is a resistant cookie batter, some shot-like shapes to mold it, some chocolate to coat the interior, and you’ll be able to drink milk from within the cookie. Savage! Full recipe here. […]
[…] -Read More – […]