
I haven’t made caramels for quite awhile, and I’ve been really wanting to for several weeks. And I’ve been procrastinating for several weeks, too. No idea why – it’s possible I’m just lazy by nature (I totally am). But we’re also at the time of year where the weather seems to be constantly fluctuating between sunny and rainy and I always end up feeling tired and out of sorts. I’ve read articles about low pressure systems affecting people like this and I believe it. Ugh. My brain is mush. I think that’s why I also fell so far behind on posting (I’m SO far behind). But I finally made myself get up off the couch (I was really busy – those crappy movies won’t watch themselves!) and get into the kitchen.
I made these caramels using a different technique than what I’m used to. Every caramel recipe I’ve ever made in the past has called for the sugar and corn syrup to be heated together, usually to somewhere between 245°F and 320°F, and then combined with the other ingredients and brought up to the final temperature and caramelized (although I’ve also seen some recipes where all the ingredients are combined right off the bat and just heated all together).

For this one, the granulated sugar is heated separately and fully caramelized (without even the use of a thermometer) before adding to the other ingredients (I didn’t measure the temperature this time, but I discovered later that the sugar cooked to a whopping 350°F!!). This gives the final product a much stronger caramel flavour – almost bitter – and cuts down on the overall sweetness. I’m not entirely sure why this recipe separates the sugar and corn syrup like this. Better control over the caramelization process? Quicker caramelization? I honestly don’t know. (but I did a little experiment the following week – coming soon…)
This is one of the techniques I learned at a caramel-making course I took last year. And David Lebovitz also offers similar advice on his site (regarding cooking sugar to the point where it begins to smoke), although his post is specifically about caramelizing sugar and not an actual recipe for caramels.

It’s a bit trickier to heat the sugar on its own like this, as sugar has a tendency to want to re-crystallize. All it takes is one sugar crystal to start a chain reaction. Heating it with the corn syrup helps to keep that in check (corn syrup inhibits re-crystallization), which is why it’s included in most caramel recipes rather than pure sugar. You might be able to see in one of the photos that I actually had a problem with crystallization around the edge, but it (luckily) didn’t end up ruining the caramels. Phew!
In the end, though, totally worth it. The caramel flavour is really pronounced, and this is a less sweet caramel than I’m used to. Which for me? Good thing, as I’m not generally a fan of really sugary treats. As I mentioned above, I tried another recipe the following week where I included the corn syrup in that initial caramelization, and it totally works! Perhaps you can try adding half of the corn syrup with the sugar (to inhibit crystallization) and half with the cream (as indicated in the recipe).
Another thing that we learned at this course that is counter to what most recipes state is to stir the caramel vigorously once all the ingredients are combined. It’s important to not stir during the initial cooking of the sugar, as that can cause recrystallization to happen. But at the second heating stage, stirring will help the steam dissipate, which is what brings sugar up to the high temperatures.

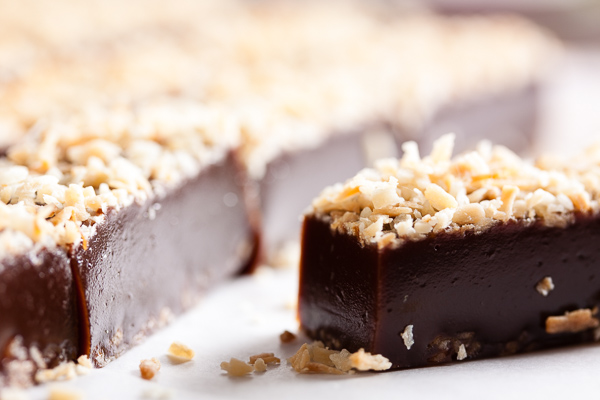
coconut caramels

This recipe was given to me, so I don't have a source to attribute it to. You can make these in either a 9 or 8-inch square pan, depending on how thick you want them to be. Note: when cooking sugar, subtract 2°F from the target temperature for every 1000 ft above sea level.
ingredients
1 cup sugar
1/4 cup water
1/2 cup + 1 tablespoon whipping cream
3/4 cup glucose
1/4 vanilla bean (or about 1 teaspoon vanilla extract)
2 tablespoons butter
1/4 teaspoon fleur de sel
1 cup shredded unsweetened coconut
To toast the coconut, heat your oven to 300°F. Spread your coconut in a thin layer on a baking sheet and place in the oven. Stir every few minutes to ensure it browns evenly. Once it's a lovely golden colour (but not too dark), remove from the oven and set aside until you're ready to add it to the caramels. It shouldn't take more than 20 minutes to toast – mine was ready in about 15. Be sure to keep an eye on it as it can burn quickly.
Line an 8" square pan with parchment paper. If you don't have one, a 9" square will work, but the caramels will be a bit flatter. There's no need to oil the parchment as the caramels shouldn't stick.
Combine the cream, glucose, and vanilla bean in a medium-sized saucepan and heat until scalding, and then set aside. Before you add the sugar later on, remove the vanilla bean and scrape all the seeds back into the cream mixture. You could probably just use a teaspoon or so of vanilla extract instead if you prefer. I actually used a vanilla paste.
Choose a large (3 to 4 quart) heavy-weight saucepan to cook your caramel in – it needs to be large enough to accommodate the bubbling up that will happen (it will bubble up a lot), but deep is better than wide so your thermometer will be covered by enough volume to register an accurate temperature (most digital thermometers have a guideline indicating minimum depth).
Combine the sugar and water in this large saucepan and heat over medium heat until the sugar has melted. Raise heat to high and bring to a boil. Using a pastry brush and some cold water, brush down the sides of the pot to ensure any sugar crystals that may be clinging to the edge are melted. Alternately, you could put the lid on the pot and let it boil for a couple minutes covered – the steam that builds up under the lid will also melt away the sugar crystals. Do not stir the sugar at this point. Stirring may cause recrystallization. Instead, just gently swirl the pan a few times.
Continue to cook the sugar until it's amber coloured and it begins to give off a bit of smoke – the bubbles should have reduced in size by this point too. Remove the pot from the burner and allow to sit and continue to caramelize off-heat until desired level of caramelization is reached. A lighter colour will give you a sweeter caramel, while a darker colour will give you a more bitter caramel. It's totally a matter of taste (I cooked mine to about the colour of a shiny penny). If you've timed this just right, it will stop bubbling once you take it off the burner, but then will start up again just from residual heat. Sadly, mine didn't do this (it was pretty cool to watch it happen in the class), but it did continue to colour as expected. The reason this is done off-heat is that at this point the sugar can turn too dark on you really quickly.
Once you're happy with the colour, pour the cream mixture into the sugar and add your thermometer to the pot. Bring to a boil and add the butter.
Continue cooking over high heat, whisking constantly until it reaches 245°F. If you prefer a firmer caramel, you can cook it to a few degrees higher (I cooked mine to just under 247°F because the humidity is pretty high here right now).
Once it reaches temperature, you need to work quickly as the temperature will continue to rise.
Remove from the heat and stir in the salt and toasted coconut. Pour the mixture into your pan – carefully, it's very hot. Don't scrape the bottom or sides of the pot in case there are some hard bits (I scraped this stuff off onto a separate piece of parchment for myself). Allow to sit for at least a couple hours, preferably overnight. If you like, you can sprinkle a bit of fleur de sel on top of the caramel after it's cooled for 5 or 10 minutes (if you do it too soon, it will just melt into the caramel, but if you wait too long, it won't stick).
Once the caramel has set (preferably overnight), you can cut it into squares or rectangles and wrap in pieces of parchment paper or wax paper. If you're lazy like me, you can buy them pre-cut.


Looks delicious. I love caramel anything, but haven’t made or had it in a while. I want to taste this! They look so cute wrapped up in the candy wrappers. Great gift idea too.
Thanks Miss Kim! I’m definitely in a caramel phase right now (there are several more recipes almost ready to upload).
Gorgeous. I love everything coconut and these look amazing!
Have a wonderful Monday!
Thanks Melanie! I’m a big fan of coconut too. The first time I had coconut caramels, they were layered with passion fruit pate de fruit and dipped in chocolate. SO ridiculously good. I’m a little more on the lazy side though. 🙂
These look fantastic! I love coconut and caramel together, this is right up my alley!
Thanks Annie! How do you feel about coconut + caramel + chocolate? Because there’s another recipe aaaaalmost ready to post… 🙂
yummy variation of caramels!
Thanks dina! There are so many fun things you can do with caramels. I’m determined to find them all…