
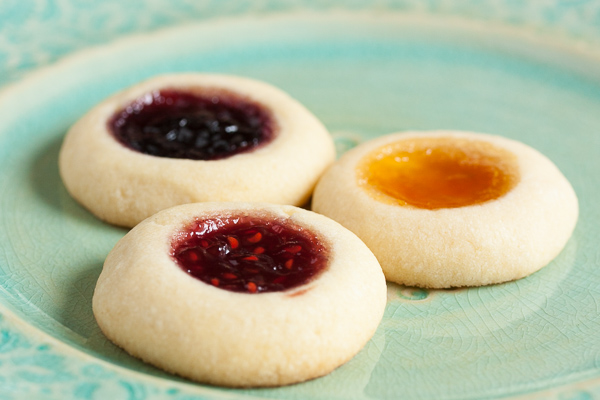
This is the cookie featured on the cover of The Gourmet Cookie Book. They look SO pretty – perfectly round little jewels. Mine aren’t quite so perfect, but the real test is the flavour. And they definitely pass that test.

Before I baked this cookie, I did some googling to see if anyone else had tried making them. Sadly, I found several blog posts from people who had a lot of problems with this recipe. Some people had them spread out too much, some had the jam run out, and others had them end up practically burned. Several people have sworn the recipe is defective. But then I found a few successes, including one person who makes this recipe every year without fail. I decided to give it a shot and see for myself. What’s the worst that could happen? If they don’t work out, I’m out a few dollars worth of ingredients and a bit of my time.
I had no problems at all.

The dough was great to work with. They held their shape really well – except for a bit of cracking around the edge as they baked – and there was no crazy spreading or leaking of jam (which is one of the problems other people had). In fact, I ended up bumping up the amount of jam in each cookie after the first tray. The recipe says to use just 1/4 teaspoon per cookie, but I was able to load them up to almost overflowing with jam. The cookie expanded and spread just enough to accommodate it. They still taste great with the smaller amount, but even better with more.
The cookie itself is soft and tender and buttery. It was definitely one of the favourites here in the office – and trust me, we had a lot of cookies here in the weeks leading up to the holidays. So. Many. Cookies. It sounds like thumbprint cookies are one of those treats that everyone remembers from childhood, yet very few people seem to make anymore. Too old-fashioned? Pfft. Poppycock!

jam thumbprint cookies

Adapted from "Aunt Sis's Strawberry Tart Cookies" from The Gourmet Cookie Book. The recipe states it makes about 100 cookies measured by level-teaspoonful. Believe it or not, I thought that seemed a bit small (I know, right??). I made them slightly larger and got 80 cookies.
ingredients
3 cups all-purpose flour
1 cup sugar
1/2 teaspoon salt
1-1/2 cups cold unsalted butter, cut into bits
2 large egg yolks, beaten lightly
for the filling
1 cup strained strawberry jam (I used a bit more than this, but I was pretty generous with it)
In a large bowl, whisk together the flour, sugar, and salt. Add the butter and blend until the mixture resembles coarse meal. The original recipe didn't say this, but one of the blog posts for this recipe that I found online specifies that this step needs to be done with a pastry cutter. I just used my stand mixer with the paddle attachment.
Add the egg yolks and continue mixing until it comes together to form a dough.
Wrap the dough in plastic wrap and refrigerate for at least 2 hours, or overnight.
When ready to bake, preheat oven to 350°F.
Remove the dough from the fridge and allow to warm up a bit before proceeding. Form the dough into small balls and place about 2" apart on a baking sheet. The original recipe stated to measure the dough out by level teaspoonfuls, but I thought that was awfully small and made them larger than that. Use your best judgment here.
Use your thumb to make an indentation in the centre of each ball, being careful not to let the dough to crack. If it does, you can try to press it back together or re-roll the ball and try again. Those cracks will allow the jam to leak out, so be careful.
Fill each cookie with the strained jam. The original recipe stated to use just 1/4 teaspoon, but I loaded each one up to overflowing. You may want to try a couple with different amounts of jam before proceeding with the full recipe. You can either use a spoon to measure it out, or transfer the jam into a pastry bag (this is what I did).
Bake for about 12-15 minutes, until lightly golden brown around the edges, rotating the baking sheet halfway through. Allow to cool on a wire rack for a few minutes before removing the cookies from the pan and allowing them to cool completely.
According to the original recipe, these can be made up to 1 month in advance and frozen. Mine were all gone within a week.


your jam pics are great–you can really see the texture. they look yummy!
Dina, you are so good for my ego! thank you ♥
These look so delicious! I have a fresh jar of peach jam that is going to make a perfect little cookie now 🙂
Peach would be fantastic with these! Please let me know how they turn out. 🙂
Can I replace the all purpose flour with cake flour? 🙂
Hi Ninamarie! I haven’t tried it myself, but according to Joy of Baking, you can substitute 1 cup plus 2 tablespoons of cake flour for each cup of all-purpose flour called for in the recipe. So here you would need 3 cups plus 6 tablespoons of cake flour. Hope that works!
I have made these every year since this cook book was published,I do make them small for christmas trays-since I make so many other cookies, This cookie never fails to impress.
I mix in a stand mixer with paddle and they are always as promised
btw your photos are great
Thank you so much Judi!
The good news is that they taste great! Unfortunately the dough didn’t turn out for me however. I halved the recipe but ended up using 2 eggs anyway because It was very crumby. It barely came together with the 2 yolks. Left it overnight and it was no better the next morning. The cookies didn’t spread or settle very much during baking and there was a lacey edge around each cookie. I’m sure I halved the recipe properly. I used unbleached flour and salted butter. Also a pastry crumber instead of a machine. Maybe the isue lies in one of those substitutions. Give it a whirl despite my problem! They tasted marvelous, just not as pretty as the pictures in this recipe. Thanks for posting it!
Hi Chelsea – sorry for the late reply. My spam filter wasn’t working and unfortunately your comment was buried within dozens of spam comments, so I didn’t see it right away. :-/
I’m sorry to hear the cookies didn’t spread out as expected. That happens to me sometimes too, and usually I have no idea why. One day I’ll bake a recipe and it won’t spread, and then the next time I make it, it will spread beautifully. There are so many variables – temperature of the room, maybe the measurement of the flour was slightly off, maybe the eggs were a little smaller than usual? Could be so many things.
Generally, if I find a dough is really not feeling right – not coming together and too crumbly – I’ll go ahead and add a tiny bit of water, just to get it to hold together and behave. You’d be surprised how little is needed – like a half a teaspoon might be enough!
I am glad to hear they tasted good though! That’s the most important part, right? Thanks for posting 🙂